I always get emails regarding downsizing, and ways and means of avoiding, why you should do it, how long you should do it for, etc.
Basically, the simple answer is, there isn't a sure fire method. Believe it or not, everyones body is different. For me, I had to downsize for a long time, due to my body being a slow healer, some people may only have to do it for a few days, a week, or whatever. But I shall try to explain in this blog, when, where, and how it should be done, maybe then, it'll help, and I can be lazy and forward this page on to people.
So you've got a cut, you've stretched, your ear has swollen, your ears are looking thin. Well, now is the time to consider downsizing. That's right, all that hard work you've taken to get to a size you like, you have to go backwards. Unfathomable. I know. But, if people realised that stretching isn't a race, it isn't something you rush to beat your friends at, it isn't when you buy a 2" plug, and you're at 1 1/2" and decide to force it in because you're impatient, it's about time, these holes you're putting in your body, they're permanent. Anyway. Lecture over.
If you've got a cut, your ear looks swollen, then take out the jewellery and drop it, by a size, maybe two depending on how bad it is. Make sure you do salt water soaks (if your ears are big enough to hang in a shot glass with salt water), or using cotton buds (q-tips to americans) clean the wounded area twice a day, pref in the morning, and then at night. Keep doing this, and eventually it'll go away. Do not use anything else, like neosporin, germoline, savlon, or other antiseptic creams, as believe it or not, in a stretched ear, these keep the bacteria rife in the ear, rather than killing them.
Once, you've done your salt water soaks, I personally would avoid using oils for the time being if you've got a cut, as I find that they can be irritating to the ear. Generally, downsizing by a few sizes will cure 99% of all problems, and if you've got cuts, it can take a while for the cut to disappear, and you have to be certain it's gone, even if your ear is gapping, putting in the bigger jewellery again can cause the rip to re-open.
So you've got thin ears, and you want to thicken them up. Pretty much follow the same advice as above, but without the salt soaks. Use plenty of oils, vitamin e, emu, jojoba, bio oil, cover them from night, morning and day, and downsize by at least 2/3/4 sizes if you can. Your ears will feel loose, and they'll feel warm, but by not down sizing huge amounts, you should find, in theory your ear closes up around the jewellery. Then, I'd leave it for about 2 - 4 weeks, then I'd gradually start stretching up slowly, for me personally, I downsized maybe every 3/4 months just to keep that consistancy in my ears. But that was me.
Hope this helps!
Peace
Monday, 11 July 2011
Thursday, 26 May 2011
Monday, 4 April 2011
Stretching Labret
Have you ever wondered how to stretch your labret? Well, in this little tutorial, I will let you know how.
Stretching your labret, is similar to stretching your ears, but it takes a little bit longer, and it pinches a little bit more, due to the lip being a bit thicker, and in constant use.
Beginning, you can do this similar to your ears, you can star with just a basic piercing, dermal punch, or pierce and stretch. If you get it pierced at 1.6mm, it's a little bit more difficult to start, but it's still do-able. I myself, personally got it pierced at 4mm, and stretched straight to 6. It cut out all the difficult small sizes, and started me off with a hole :).
So, you get it pierced at 1.6 (14g), you've waited upwards of 4 months for it to fully heal, and you want to go to 2mm (12g). I used septum bullets, when I stretched my snakebites.
These little items, go up to 8mm, and are perfect for stretching labrets. I myself dead stretched, because it was easier, if not a little bit more expensive as I got to the bigger sizes. Dead stretching is a method of where you size up when you feel the current jewellery is loose. You will need custom jewellery when you stretch your labret, as you need stuff with a flat back so it doesn't rub against your teeth.

Sunday, 3 April 2011
Interviews..
I will be having a series of interviews with people who are famous within the modification scene, and asking them questions I feel people will want to know. The first in the series is the one, and only Bear "Big Ears" Belmares.
I hope you enjoy, as soon as the interview is done, I will post it up for you to read!
Peace.
I hope you enjoy, as soon as the interview is done, I will post it up for you to read!
Peace.
Monday, 28 March 2011
Where to buy jewellery?
One of the most common questions I ever get asked, is where do you buy jewellery, and to be honest, it changes, there are so many places you can go, but you just have to do a little bit of looking around, so I will be building up a series of links of where you can buy jewellery from. I have bought jewellery from most, if not all of these people.
So, here we go.My list of websites which contain hand made, large ear'd stretchers, and bespoke body modification jewellery!
Heart on Sleeve - His name is Mark, the guy is a genius. He made my 3" oak plugs, he is affordable, and quick.
Black Heart Organic - I haven't bought any jewellery, but the collection is amazing, some of the nicest woods and customs I've seen.
Wood Plugs - Again I haven't ordered, but seems to have a very good portfolio of work, and doesn't just do ears.
Aesthetic Body Mod - I have bought a lot of labret, and ear jewellery. I love their PMA stuff, and it's all custom
Kings Body Jewellery - Good for your basics, 2" eyelets, labrets, BCRs too.
Body Jewellery Shop - Probably one of the best and most known UK sites. Cheap tapers, cheap plugs, free P&P, great selection.
Bodyartforms - Again, another amazing website, bought lots of jewellery from this.
This is the best list, and if you can't find it between these guys then it doesn't exist.
Hope this list of body jewellery suppliers helps.
Friday, 11 February 2011
Getting my ears stitched shut...


Welcome! What a way to start, with a picture of my old ears. As you can see, they weren't exactly the nicest of looking things, and due to a lot of trauma, the ears themselves were dead, and un-stretchable, and causing me a lot of self confidence issues, with children, parents and generally anyone thinking they're allowed to make comments.
So, on Saturday the 5th February, me and my beautiful girlfriend headed down to our appointments, and sat and waited. My girlfriend got branded, and it looked amazing, I am intrigued to get it done myself. Anyway, the procedure took just over an hour, and I can't really say how he did it, but I have included a gallery of pictures. Enjoy.


Wednesday, 2 February 2011
Stretched Jewellery Lingo... And more advice
So, you maybe sitting there sometimes in amongst a conversation of people who have stretched ears, or one of them has, and he's using language like "tapers", "dead stretching", "teflon tape", "weights". What does it all mean? Well, I wouldn't worry too much, as I am here to help.
Dead Stretching - This is the method of stretching, where you are using jewellery of a bigger size, and putting it straight in to the hole, when you feel it is ready to be stretched. For example, going from 1.6mm to 2mm using a 2mm ring, that would be considered a dead stretch. Or using a 12mm tunnel, to stretch a 10mm hole.
Dead stretching is fine, if you can afford to do so. For me, it's a bit silly, as it's expensive, because you're buying a new pair of jewellery at each size, just to wear for a month or two, and then stretching again. Secondly, the jewellery jumps two sizes, which is a big no-no, as it is too much trauma on the ear to be jumping two sizes at once. Think about it, 2mm hole, 4mm jewellery, that is an expansion of over 100%, so you're increasing it's size by over 100%. Think about it, and be careful when dead stretching, as it leads to problems with impatient peopple.
Double / Single Flared - This is a type of jewellery, more common in steel. I've attached an image below.
 This is double flared jewellery, and single flared is the same, but it only has one flare (the lip at the front). When putting in double flared jewellery, please be careful, as obviously, the flare is usually .5mm bigger than the internal diameter, people often get the jewellery stuck in there ear, as the inside measurement, maybe 6mm, but the flare is sometimes as much as 7mm. Never stretch with double flared jewellery, due to the sizing nature.
Tapers - Tapers are cylindrical tubes, solid, made from steel, acrylic, PMA etc. They are the most common form of stretching, and usually go up to 1" in size. Tapers are useful due to their cheap nature, with kits going up to 1" usually at about $15. But be careful when using tapers, as they generally contain 4 sizes in one tube, e.g: 4mm - 8mm. So, the beginning will be 4mm, and the end being 8mm, usually people get a little bit too excited and try and force the whole thing through, so please be careful, and just take it easy, just because it can go all the way through, doesn't mean it should!
Vitamin E Oil - Vitamin E oil, is used by people who want to look after and condition there ears. There are many different forms, all of which are recommended below. If you have dry, sore or thin ears, then massaging vitamin E oil in to them twice a day will develop them in to a much healthier condition. Bio-Oil, 2-Ounce Bottle 100% Pure Emu Oil (2oz)
 Desert Essence Organic Jojoba Oil, 4-Ounce Bottle
So, hopefully what I've said above will make you a little bit clearer about some of the "lingo" used within the piercing industry.
Dead Stretching - This is the method of stretching, where you are using jewellery of a bigger size, and putting it straight in to the hole, when you feel it is ready to be stretched. For example, going from 1.6mm to 2mm using a 2mm ring, that would be considered a dead stretch. Or using a 12mm tunnel, to stretch a 10mm hole.
Dead stretching is fine, if you can afford to do so. For me, it's a bit silly, as it's expensive, because you're buying a new pair of jewellery at each size, just to wear for a month or two, and then stretching again. Secondly, the jewellery jumps two sizes, which is a big no-no, as it is too much trauma on the ear to be jumping two sizes at once. Think about it, 2mm hole, 4mm jewellery, that is an expansion of over 100%, so you're increasing it's size by over 100%. Think about it, and be careful when dead stretching, as it leads to problems with impatient peopple.
Double / Single Flared - This is a type of jewellery, more common in steel. I've attached an image below.
Tapers - Tapers are cylindrical tubes, solid, made from steel, acrylic, PMA etc. They are the most common form of stretching, and usually go up to 1" in size. Tapers are useful due to their cheap nature, with kits going up to 1" usually at about $15. But be careful when using tapers, as they generally contain 4 sizes in one tube, e.g: 4mm - 8mm. So, the beginning will be 4mm, and the end being 8mm, usually people get a little bit too excited and try and force the whole thing through, so please be careful, and just take it easy, just because it can go all the way through, doesn't mean it should!
Tuesday, 1 February 2011
So.. You've started stretching..
...Now what? It's quite easy to get complacent when stretching, you get over excited, you want to get those shiny 1/2" plugs in. So what happens when it goes wrong?
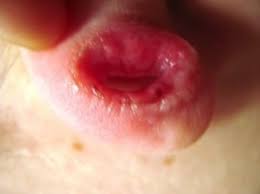
This beautiful picture is a blow out. Which happens when an ear is stretched far too quickly. What you're seeing is referred to (and not technically, or professionally) as "the cats ass hole", due to the nature of how it looks. Beautiful no? Blow outs are formed by the tissue inside your ear, forming outside. Generally leaving you with what looks like a wide ear. Sometimes blow outs can be small, sometimes they can be huge (trust me, google Blow Outs Ears). But generally, with a bit of downsizing you can eliminate blow out if you recognise and catch it when it first happens. The best way to avoid it, is don't jump sizes, don't stretch too quick, and if you feel your jewellery is getting itchy, maybe clean it.
So, to sum up, all of these things can be solved by downsizing and cleaning with a salt water solution. Downsizing, should be by a couple of sizes, and done for around a month, or until the infection has cleared up sufficiently.
Please remember, it isn't a race. You'll have your ears for life, lets make them last that long!
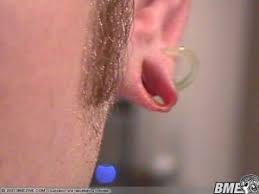
This is severe thinning of the ear, maybe rushing it too quick, not looking after it, cold weather etc.
How would you fix this I hear you asking? Well, I would hope that none of you reading my blog are intelligent enough to realise, that maybe the person in this picture could've stopped it before it got this far. An ear doesn't become this thin over night, it's a very gradual process. It'll start with an infection, maybe a small cut on the inside, or a cut which runs along the outside of the ear. Best thing to do, straight away is clean it using salt water, and downsize to a smaller size. Doing this as soon as you notice a cut, infection or anything similar, will increase your chances of maintaining and having nice ears.
So, to sum up, all of these things can be solved by downsizing and cleaning with a salt water solution. Downsizing, should be by a couple of sizes, and done for around a month, or until the infection has cleared up sufficiently.
Please remember, it isn't a race. You'll have your ears for life, lets make them last that long!
Monday, 31 January 2011
Where to begin when stretching your ears..
So, you've decided you wanted to stretch your ears. Where do you begin? The initial beginning process is very simple, visit your local piercing shop, make sure it is one you trust, and that you know is clean, ensure that everything they use or are going to use is opened in front of you, clamps, needles, and make sure they wear gloves. This is all basic stuff, and just do your research.
So, you've got your nice new wonderful piercing, what to do next? Well, wait a bit, it takes up to 6 weeks for the initial piercing to heal, and I'd wait another 6 weeks before starting to stretch.
So, how do you do it? You can either do it yourself, or you can go to a local piercer who will do it for you. You need to use things called tapers, which are little cylindrical shaped items, kind of look like a toothpick, but they get slightly bigger at one end. Usually made from acrylic, PMA or surgical steel. The best way to start is usually in small increments, e.g: 1.6mm (the diameter of the ring) to 2mm, you use lubricant of some form, K.Y, emu oil, Jojoba, and others, and slide it through, you may feel a slight bit of resistance, but it shouldn't feel too tight, if it's too tight and you have to force it through, you're going too quick, and just go back to your original size.
Sunday, 30 January 2011
Welcome..
Welcome, my name is Roger Adams, I am knowledgeable in piercings, and stretching them mainly. I am from the UK, and I have a YouTube channel which shows me through my journey and gaining 80mm ears.
I am passing on my information, and I am looking at trying to educate the masses.
I will update this as much as I can, and if you want to ask me anything, then please ask away!
I am passing on my information, and I am looking at trying to educate the masses.
I will update this as much as I can, and if you want to ask me anything, then please ask away!
Subscribe to:
Posts (Atom)